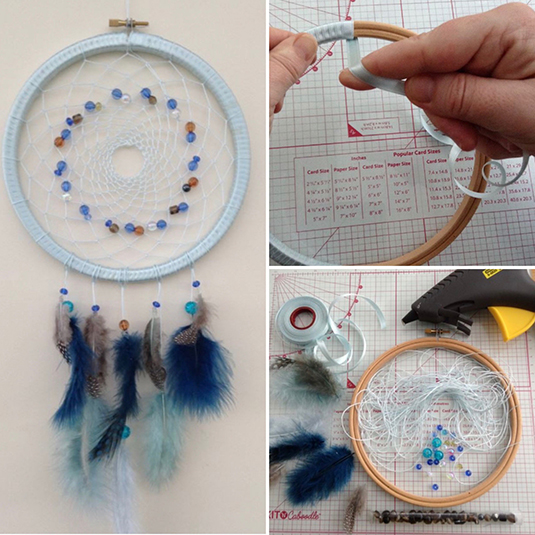
How to Make a Dreamcatcher
In Native American culture, dream catchers were believed to catch and trap bad dreams, whilst allowing good dream to pass through the spider-web design, and drift into the heads of the children that lie sleeping below them. Nowadays, dreamcatchers come in many shapes and sizes, and are an incredibly popular bedroom decor choice! If you’re ready for some sweet dreams, why not learn how to make a dreamcatcher?
You Will Need:
- 7” Embroidery hoop or metal hoop, you can make one any size
- Ribbon or Flat leather
- Any beads you have on hand.
- 6-10 feet of thick cotton crochet yarn or thread
- Variety of feathers
- Sewing thread
- Hot glue gun
Before you start your project, gather all your supplies and have a quick read through the instructions.
Step 1:
Take your embroidery hoop and, starting at the top, wrap the hoop with either the ribbon or flat leather cord. Begin by using the glue gun to apply a small amount of glue to one end of the ribbon, and stick it to the hoop – this means you can avoid tying a knot.
Step 2:
Working all the way around the hoop, wrap the ribbon so none of the hoop is showing.
Step 3:
When you get to the end, covering as much of the hoop as possible, trim off the ribbon, and glue the end in place.
Step 4:
Divide the hoop into 16 equal parts, by marking in half, using a pen and then half again, to create four quarters. Next, divide (and mark) each quarter by three. For ease of wrapping, take the thread and wrap round your fingers, slide it off, and then wrap round the middle. This enables the thread to pass through loops easily. Threading through the mechanism of the hoop, tie a double knot at the top mark and for extra security, glue in place. At the next mark, wrap the thread from the inside over the hoop to the back. Pass the wound thread through the loop and pull it tight, repeat the process to the end. Make the last loop/knot on top of the first. For the second layer, weave at half way through the previous layer. Push the thread from the front through to the back.
Step 5:
Now bring the thread back through the loop you have just made.
Step 6:
Repeat until the end of the second layer. Weave the third layer in the same manner.
Now weave your fourth layer with beads. It’s up to you how many beads you use. Weave at the middle of the first loop without beads, then thread your beads (I’ve used two!) onto your cotton. Weave into the middle of the next loop.
Step 7:
Repeat until the end. If you are using 2 beads, you will use 32 beads in total.
Weave the fifth layer by weaving into the thread after the beads on the previous layer, this holds them securely.
Step 8:
Repeat this process until the end of the beaded layer. Weave the sixth layer by working into the centre of the fifth layer. Keep weaving until you can see a small circle in the middle of the hoop. In this project, I did another eight layers.
Step 9:
Finish off by passing the thread through all the previous loops on the last row in a running stitch. Then complete your project by knotting, trimming and gluing to secure.
Step 10:
Now to add the feathers and the rest of the beads! I like to work with odd numbers, so cut five lengths of thread:
- 1 x 10”
- 2 x 8”
- 2 x 6”
I used the same thread as the webbing, but you could use thread, lace or ribbon.
Using the longest thread, attach it to the hoop by looping over the top of the thread by roughly 2”. Feed the loop from the back, through to the front, at the bottom of the hoop.
Step 11:
Feed the two threads (short and long tails) through the loop, and pull tightly.
Step 12:
Repeat with the 8” thread leaving a gap of about 1” either side of the longest thread. Finally, repeat with the smallest thread, but just double this one.
Step 13:
Working from one side, thread a bead onto the shortest thread then attach a feather. Tie the feather to the thread with sewing thread and a dab of glue to secure. Carry on until all the threads have a bead and feather on them.
Finally take approx. 8” of string or the weaving thread, fold it in half and tie. Thread this loop through the top of the hoop. You can now hang your dreamcatcher! Now you know how to make a dreamcatcher, why not experiment with different threads, feathers and beads? You could also try different patterns with the webbing. Make one for every member of the family, one for every bedroom, or create beautiful personalised dreamcatchers as birthday presents for friends!